Replacing the Flying Scot main halyard


Replacing the Flying Scot main halyard
|
|
| Home | Lessons | Rentals | How To | Forums | Videos | Texas Regattas | Bookstore | Search | Sailboats for sale |
| Sailboat Photo Gallery |
Sails |
Scam Warnings | Texas Lakes | Advertise with us | Contact | Free Sailboat Ad |
|
Replacing the Flying Scot main halyard is not hard to do, but you want to do it correctly. Routing the halyard incorrectly makes it rub and wear on the winch. There are two posts of the winch near the mast, the main halyard runs to the outside of the lower post and between the post and the mast at the top one. The lower spool is for the main halyard, the upper for the jib halyard. I start by attaching the end of the halyard to the lower winch spool, but if you just bought a new halyard from Flying Scot with shackle attached you'll want to start at the top of the mast, and basically work backwards through this video. Do NOT use a regular piece of stainless steel cable for your halyards, they will NOT work. The Flying Scot halyards are special, they are made of very fine flexible wire so they can wrap around the small winch spools. Regular cable will soon become a tangled mess. Since the halyard supplied by Flying Scot comes with a very nice $20 shackle already attached it is a very good deal. When attaching the shackle in the video to save bandwidth and shorten the video I cut out the part where I tightened the bolts of the suage tool. Be sure to tighten these bolts ALL THE WAY to completely compress the suage! I use two suages. You need the Flash plugin to see the video, click the play button to start the video.
See more "How to Repair" articles and more in the Sailing Video Index |
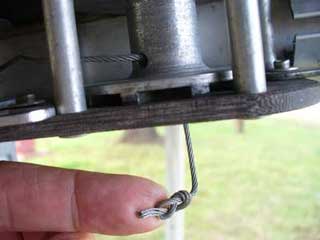
Click the play arrow (maybe twice), to see the video. Tools you may need. Suage tool, 1/2 inch wrench for the tool, suages, cable cutter. To install a new halyard with shackle already connected, you may not need any of these. A simple figure 8 tied in the end of the halyard as shown below will hold it on the winch just fine. Pass the end of the main halyard into the hole in the lower winch spool. Be sure to route the main halyard correctly as shown in the last photo Instead of using a suage to secure the end of the main halyard, a simple figure 8 like this works fine for me. The jib halyard is bigger, and therefore harder to tie a figure 8 in so I use a suage instead. This is the top of the winch. Note the smaller main halyard is behind the post, while the large jib halyard I am holding at an angle goes on this side. |